Showing posts with label Our Home. Show all posts

12/30/12

Big Girl Room Inspiration

With the arrival of baby girl #2 approaching rather quickly, Brian and I have had to scramble to figure out where EA is going to sleep!

We decided #2 will use the nursery almost exactly as it is, minus EA's initials and pictures that are currently scattered everywhere. EA will move next door to what is currently the office/craft room/ misc. junk room. 

Monday and Tuesday are booked with plans of emptying that room. I am not sure what to do with some of the craft supplies I have collected over the years but don't actually have a use for until EA is old enough to use them with me, but we will figure it out. We will buy some of the furniture this weekend and paint the rest of the furniture next week.

After spending lots of time online trying to find exactly what I wanted to do in that room, I have found a few inspirational ideas on Pinterest that have really gotten the ball rolling.


Taza Tarika in yellow


Dottie quilt- found here

I have located a basic comforter, owned the dottie quilt for quite some time, compared prices for the Tarika fabric on Etsy, and began picking out photos and quotes for the wall collage. Hopefully it will come together well.... we just have to empty the room!

Have a great Sunday!

11/6/12

Symptoms

So, being in the second trimester of my second pregnancy has really shown me a pattern in my pregnancies-

#1- The first trimester really stinks. I don't think I have any choice... I am going to be sick and I am going to be flat exhausted. 

#2- Once the sickness and fatigue go away, all I want to do is organize our house.

I am not an overly organized person. Or really, I'm not organized at all. I know where things are in my house, but the inside of my cabinets are not neat and sometimes I shove my cute shirts in the drawer with my casual shirts. And I'm good with that. I can tell you where the tape, scissors, wrapping paper, gum, at least one pacifier, and several versions and sizes of Bible are- plus several other things, so really, it's fine.

But when I'm pregnant, all I really want to do is buy all the awesome organizational stuff I was able to purchase as a teacher and smother our house with it. 

Right now, my list includes (but is not limited to..)

- the office/ craft room/ EA's future big girl room.
We have changed this room a jillion times since we moved here, but what is most commonly used for is holding junk. Pure and simple junk. Come April, we will have to to rid of all the stuff we haven't needed since we graduated from college, but have been unwilling to get rid of, because a child will be living and sleeping in what was formerly the junk room.

-Our desk. 
We moved my desk while growing up from an entry table to a desk in our bedroom a few months back. It is definitely good for the space in the living room, but has since been littered with misc. stuff. It's time to buy some cute organizers, stick a label or two on it, and make that baby look pretty!

-Our pantry.
For the most part, I was prepared when EA was born. We had all the stuff, we had a place for her to sleep, I had a way to save money buying her clothes, etc etc. Then we were hit by the bottle monster. They were constantly laid out all over our kitchen. It drove me absolutely nuts. And even now there are sippy cups and boiled pacifiers and fruit cups ready for our disposal. On our kitchen counters. I hate it. So, in the next 5 months, I will clean and organize our pantry, making a shelf for all the kitchen stuff that just won't seem to disappear.

So these are my majors. Right now I am just in the research portion of my organization. You know, the spend extra time on Pinterest looking for cute but very neat and clean options for simplifying your life, portion of the organizing.

If anyone has any great organization websites, please let me know. I'm ready to get this party started.

Don't forget to vote today! And have an awesome Tuesday!

4/17/12

Added color.

Several weeks ago, I found this idea on Pinterest. My mom does not just have a green thumb... she has a green hand. And not a bit of that rubbed off on me. But I do love a blooming flower.

I loved the bright colors from the post, but knew our house needed something a little more subdued. I used three clay pots and spray painted them black. I used my Cricut to cut out white vinyl circles and add them to the pots. Once I put the soil in the bottom pot, we put a metal rod through all three pots so they wouldn't blow off.  
 We are enjoying petunias for the spring and summer, but can't wait to add pumpkins in the fall! There is so much potential!

12/8/11

Our Christmas Mantel

I was very pleased with our Christmas mantel this year! I knew I wanted something similar to what I had done in the past, but wanted to change it up a little to make it more unique to the year.

I used leftover scraps from our tree to make garland and added berries for a little extra color. Though it does not sit as high as artificial garland, I love the smell and the extra spunk that it adds to our decor.

On the right, I used our Willow Tree Nativity wall hanging and paired it with the Isaiah printable from Jones Design Company.

For the left, my mom and I had a craft night one evening when Brian was out of town and made book Christmas trees. After folding the pages, I hot glued the book trees onto various candle holders to change up the heights.  It was such a simple craft and added a fun, classy look to my mantel display.

We placed our Willow Tree Nativity on our entry way table. I covered the table with burlap to give a more rustic look. We used our three stars as the backdrop- a great deal from Kirkland's a few years ago. We added height with a wreath on a wreath holder. 

Hope everyone is enjoying the Christmas season!!
Linking up here and here!


12/6/11

Our Christmas Tablescape

I love the challenge of setting the table for holidays or events. I like to use what I have and see what I can come up with. This year's Christmas table is a mix of old and new with new napkins from Pottery Barn accenting my Christmas china.

I began with my favorite burlap runner and layered with a solid brown runner. I puddled three striped napkins in the center of the table and topped with two artificial trees and a dome full of miniature ornaments.

At each place setting, I used my red chargers, my Christmas tree plates, and a striped napkin. I finished the napkin with ornament napkin rings inspired from here.

I topped the buffet with homemade garland made from our Christmas tree. I used berries to add a bit of color and placed our Nativity from Bethlehem as the centerpiece.

Can't wait to see everyone's tables and Christmas decor!

The Lettered Cottage

12/5/11

Dare to DIY- Homemade gifts

Dare to DIY

This week's Dare to DIY Challenge is homemade gifts!
My problem with homemade gifts is that I tend to kill a dead horse...
I make the same thing a billion times and it is no longer unique or fun, so I love this challenge to get new ideas!
My favorite homemade gift this year was inspired from Pinterest (of course!)
When I found this Christmas mantel this summer, I immediately knew I wanted to try to make one of the O Holy Night boards- so cute and such a perfect addition to any Christmas display.


I used a 1x6 piece of wood for the background and asked the hubs to cut, sand, and spray paint it. I used my Cricut and Sure Cuts Alot software to cut the letters, then modge podged them onto the board. I let everything dry, then placed a hanger on the back and voila!
We actually made our first board in August for my mother-in-laws birthday, but have made two more recently for a friend to give as Christmas gifts.
I also made one for Emily Ann's nursery- I love that any phrase can be appropriate. Simple and elegant.


Another favorite homemade gift I am enjoying right now is the yarn wreath. I made a cute gold one for the fall, but wasn't quite finished with my obsession, so I made a Christmas one as well!


There are tons of fabulous directions around the blog world, but they are super easy and such a clean door decoration. The red on the door pops from the street- so much fun!

Have a great night friends!

11/20/11

Dare to... Entertain!

This week's Dare to DIY challenge is Dare to Entertain!

Dare to DIY

Brian and I began hosting a friend's Thanksgiving potluck dinner our second year of marriage. It is nice because it gives us a chance to pull out our fine china, try out new recipes, and spend time with friends. We have been with different people and done different things each year, but we always try to make it part of our Thanksgiving celebration. 

This year's dinner is tonight and I am so excited! There will be 10 people eating, so we had to be creative with our chairs- I was just excited we were able to fit 10 chairs around our table!


I started with my burlap runner and topped it with a more narrow brown runner. I used my new wooden candle holder (a freebie from a sweet friend!) and alternated each votive with either a flower or a candle. I had a few extra tea lights, so I used them around the candle holder. I also sprinkled coffee beans all over the table for a little fall feel.


We pulled out our fine china and silverware, but went with mason jars for drinking glasses. I really like the mix of the formal and casual and can't wait to find more uses for the mason jars! I wrapped our silverware in brown napkins, then tied a strip of burlap over them. I attached homemade place cards to each napkin with a piece of twine.


Once I was done with the table, I added a bit of festivity to our buffet as well. I hung my Thankful banner over the buffet.  Next, I placed a piece of wrinkled burlap on the corner. I topped it with our pumpkins and our letter J. I also added the two extra mason jars with flowers and a few more coffee beans to add congruency. We will put our desserts on the buffet!


Thanks for checking out our Thanksgiving table!

It's not too late to join the party! Head to Newly Woodwards and link up!
Next week's theme is Dare to... Eat Cookies! Can't wait to find some new recipes and bake some cookies!

Don't forget! 20% off everything in my Etsy shop until Tues., Nov. 29th! Coupon code Thankful!

10/15/11

Door decor

I need to begin this post by informing you that I have a Pinterest problem.
It's so incredibly addicting and I continually find projects to work on- though they take much more time than they used to.

My most recent find was the yarn wreath. 
It all started at the hospital. The day after EA was born, I was dying to get out of the room, so I took a stroll around the halls to look at all the door hangers. Some were cute, some were subpar.... 
then I found this jewel..
So so cute. Classy. Simple. Ahh and the obsession began.

When I finally began functioning again, I decided to see what I could find on Pinterest and online in the way of yarn wreath tutorials and found some precious wreaths. See...


 This week, I finally got started making my own and found it was so easy! All you need is a straw wreath form, yarn, and hot glue, plus whatever embellishments you want. Wrap and glue, wrap and glue. 

Here is my version of the yarn wreath-

And on our door...

Happy Saturday!

Linking up to Tatertots & Jello!

9/28/11

Fall Football Mantel


Happy Fall! 
I adore this time of year! The weather in Birmingham is beginning to get cooler and the fall and Christmas decorations are filling up the craft stores. I love it! 

My mantel is definitely centered around my favorite thing about fall- Auburn football! 
The banner is one of my custom creations from my new Etsy shop So Filled With Love. I have Auburn, Alabama, and fun fall and Thanksgiving banners, so check it out! (I can also do custom banners, so let me know if you are interested!) I added Aubie, a framed picture of Samford Hall, and 3 cute decorative pumpkins and voila! I am so pleased with how it turned out!

(A closer look)
I am linking up to the It's Fall Ya'll linky party over at The Lettered Cottage! There are so many awesome mantels- such great inspiration!

Have a super Wednesday!!

The Lettered Cottage

8/20/11

Home Management Binder

As I was browsing Pinterest earlier this week, I found an idea for a Home Management Binder to contain all of the major household organization items. Like most of the ideas I find on Pinterest (while I am waiting... um... patiently for my baby), I thought it was genius, determined I would begin mine the next morning, and went to sleep.

After browsing A Bowl Full of Lemons post and pictures of her binder the next morning, I knew this was a must for our household. I have been trying to determine a way that we can organize our information and have it in one neat, concise place. In addition, with the change in our budget, we have to be much more serious about the money we spend and where we spend it. As I looked through Toni's binder ideas, I began thinking of the information we would need or want close at hand... 

our budget
a monthly expenditure sheet
a bi-monthly menu
a bi-monthly grocery list
a breakdown of where our envelope cash goes (We completed Dave Ramsey's Financial Peace University last November through our church. It was a great investment of time and gave wonderful resources.. we highly recommend it)
everyday gift logs
Christmas gift logs/ planning sheet
emergency contact information
important personal information
EA's immunization schedule

Following Toni's lead, I grabbed a clear view binder, a binder pencil pouch, and a 5 tab divider (all of which has a special home in our garage... one of the perks of collecting school supplies like they will never go on sale again)

I setup my labels a little differently than Toni. My first section is budget, my second is household items, my third is gifts, my fourth is Emily Ann, and my fifth is Brian and Ashley. This kept me from having to buy another pack of dividers, but still holds all the necessary information. 

As I consider our budget, menu planning is definitely our biggest weakness. As we found out this month, one trip to Sam's will kill our allotted food money... even if we need what we purchase. Because of this, this was my number one priority in setting up the binder.

After browsing the web and considering our specific needs, I created templates for our bi-monthly grocery trips and meal plans. These allowed me an overview and specific information. 
Next, I focused on our budget. 
I created a Bill and Payment checklist similar to this one from Clean Mama Printables. I added our specific bills so we would be able to track them more easily. I also added additional boxes to track things we may not have considered yet. For further budgeting, I created a Dave Ramsey-like spreadsheet with our specific spending elements. This includes our bills and food, as well as personal money and what we spend on misc items. Here is Clean Mama's overview budget for an example.

Next, I realized how often I need information about Brian's workplace and have no idea what it is so I have to call or text him to get the information. Though this works, it is not always ideal. Because of this, I created a selection of personal information forms that are specific to each of us and that will be easily accessible if needed. Items listed on these forms included name, social security, workplace, work address, work phone, general physician's name and phone, dentist's name and phone, OB's name and phone, insurance information, etc.
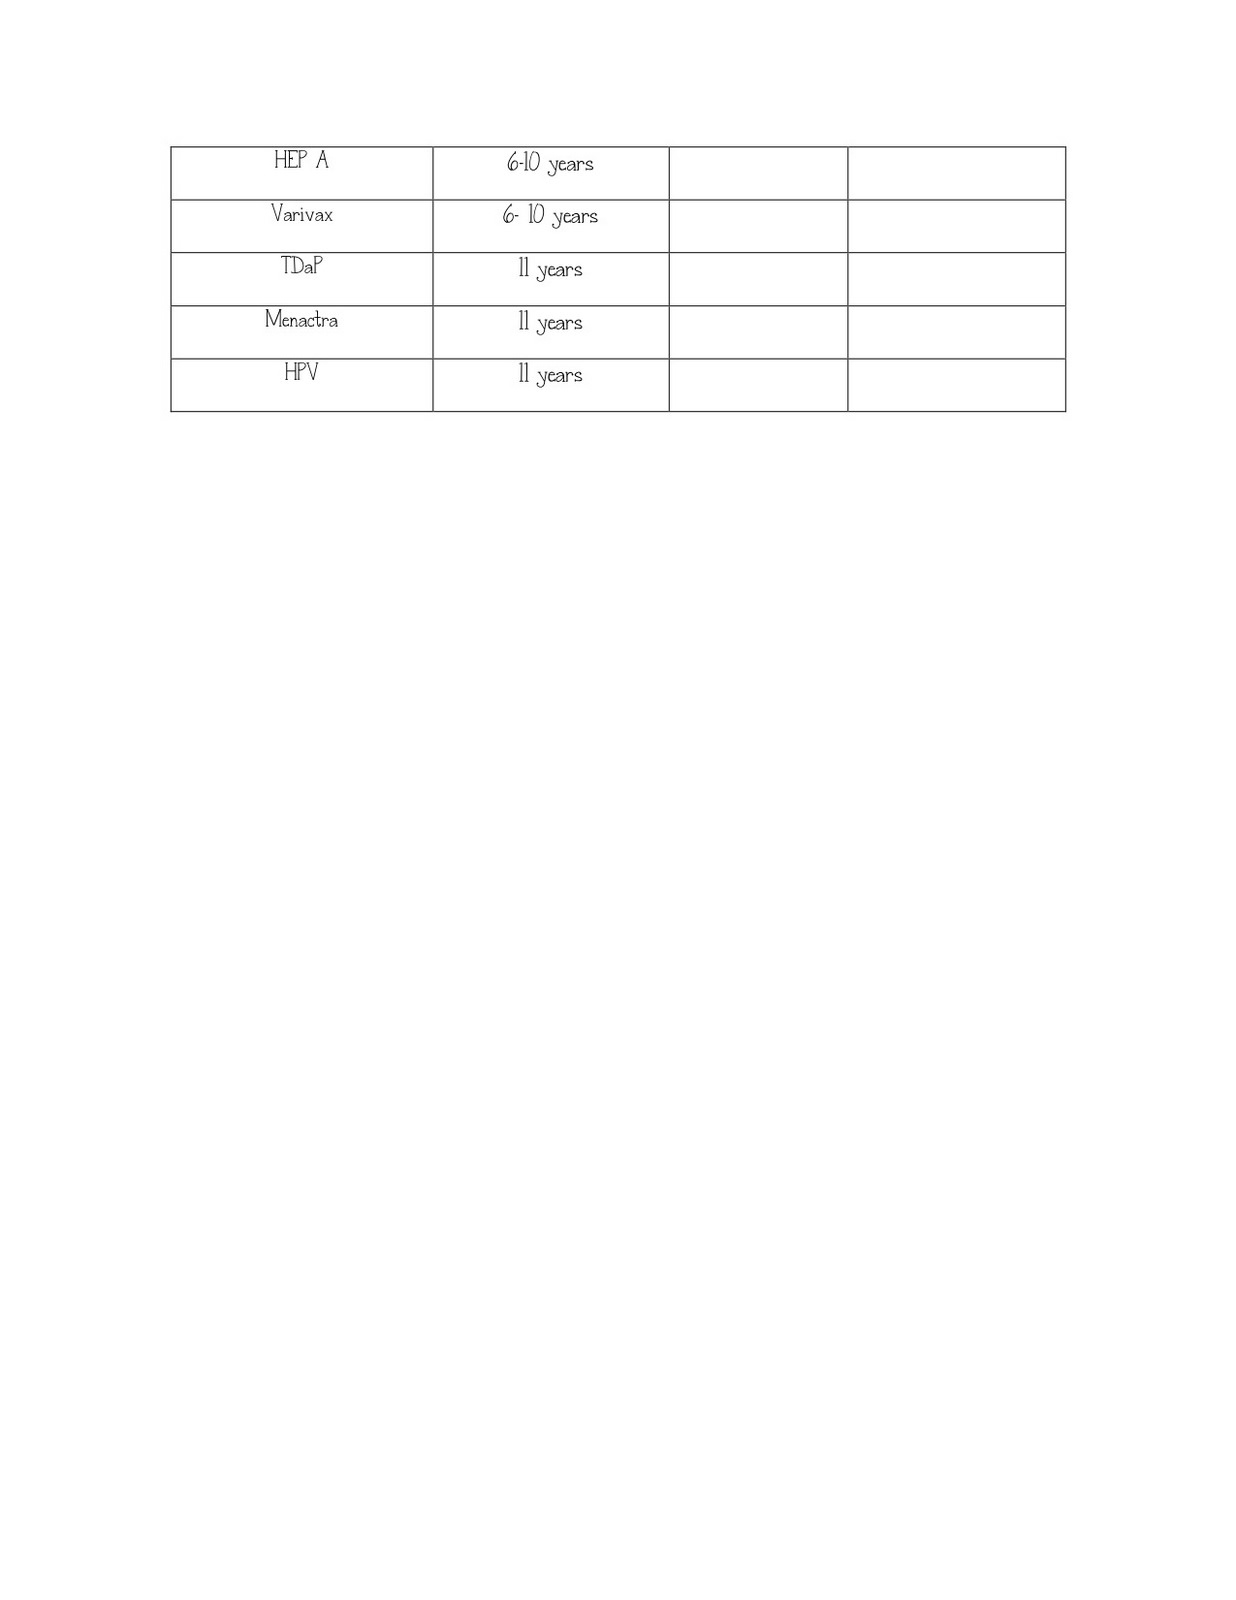
In this section, I included an immunization checklist for EA. I got this information from my pediatrician's website... this does not include all of the doctor's visits, only immunizations.

 I also created an emergency contact form similar to Clean Mama's family information form. Mine differs from hers by adding less information about the surrounding area, but focusing on personal emergency contacts and providing more space for neighbor information.

My next task was gifts. Though they are sporadic, it seems that birthdays always catch us by surprise. Add in the occasional happy day surprise, baby shower, or congratulations gift and we really struggle! Because of this, I created a gift log and Christmas gift log/ planner so that I can begin thinking about gifts ahead of time. This will also be great for me to refer back to when the next birthday arrives.
Other useful templates from Clean Mama include the Home Improvements Checklist and the Cleaning Kit. Her website is truly fabulous! Though several of these forms are specific to my family, her site offers  forms that are appropriate for everyone.

Finally, I realized that you can not have an organized and useful Home Management Binder without a cute cover! Using my rocking awesome Creative Memories software, I created a binder cover and side tab to make my binder cute!


Feel free to use the cover, spine filler, and any of the forms you deem worthy to set up your own binder. Shoot me an email if you want more information about a specific form or would like me to email you any of the forms in PDF format. Check out A Bowl Full of Lemons' Home Management Challenge  and Clean Mama Printables for more organizational ideas! 

What do you do to organize this information? Do you use a filing system, a binder, or something completely different? Are there any forms you would add to YOURS that I haven't considered? Leave a comment and let me know!

Happy Weekend!

8/12/11

Baby J- Week 37 Nursery Reveal!

In honor of being 37 weeks and full term, I am sharing Emily Ann's nursery! 

We have had the room painted since well before we found out EA was a girl- funnily enough, we changed it from pink to the brown/ grey instead of vice versa. I love the color and the way it brightens up with the white furniture. 

The view from the door :) Our crib is from Babies R Us. We went back and forth about getting a 4-in-1 but decided this was the best option for our budget. The curves and feet make it so elegant! Our bedding is from Land of Nod and was definitely the biggest splurge in the room. It is so bright and friendly- I love it!

We got this dresser from Ikea several years ago as a dresser for our guest bedroom. When we were shopping for nursery furniture, we realized this was the perfect height for a changing table! We added the changing pad and voila! 

This little corner makes me so happy! My mom made the curtains with inspiration from this picture on Pinterest. Brian's parents and brothers gave us the rocker from Cracker Barrel. The quilt from our bedding was the perfect throw for the back of the chair. The nightstand came from the unfinished furniture store about 5 years ago. We left it unfinished for years, but knew we wanted it white once we started the nursery.

This armoire came from Minerva's in the spring of 2010. I have wanted an armoire for ages and really wanted one for the nursery. We found the piece before we were pregnant but went ahead invested because it is so versatile. This piece was from the 1930's and adds so much additional space for storage. 


Here is the view from the other corner of the room.

One of my favorite parts of the room is the handmade decorations. We definitely splurged in different places when decorating this room, but I was determined to create the art myself. I spent a lot of time looking for ideas and wasted at least 5 canvases completing work that I didn't really care for and painted over in white. The best part was the things that some of my sweet friends made. It makes the room so special!

 My wonderful friend Ginny made these as part of the decorations for my Sunday School shower. I love the colors and the work she put into it. They are so cute! They are the perfect door decorations and really help the room come together. 

This Creative Memories frame/ magnet board was a wedding gift. The best part about it is that I can change it any time I like without a lot of extra effort. Right now we are featuring ultrasound pictures, but that will be changed as soon as our little girl is here.

I looked and looked for a bulletin board but couldn't how to figure out how to keep the older than newborn Emily Ann from pulling down the thumb tacks. After spending lots of time on blogs, I determined that a magnet board would be a much better option. I purchased the frame from the clearance section of Hobby Lobby and the sheet metal from Home Depot. My handy, dandy husband used his talent and tools to put it together. We used round magnets and covered them with the tops of Coke bottles that were Brian's Father's Day gift. 

I have also fallen in love with doilies! I am still not sure about this canvas, but I wanted to add scripture somewhere in the room. The doily accent makes it very sweet and feminine, but honestly, this may or may not stay- the handwriting bothers me. The picture in the frame was one of our favorites from our maternity pictures- though you can't tell in the picture, we are holding a banner that says Emily Ann.

These paintings were a true labor of love. I looked for inspiration for ages and finally came up with a mixture of a few different paintings. I created the scalloped edge, then used my Cricut to make the monogram. I found scrapbook paper to match the bedding and created pennants to go at the top of the paintings, but also used the pennants to create consistency throughout the room. They are also on our Creative Memories frame and on our magnet board. 

I have loved this alphabet canvas that I found several months ago, but needed it to match my nursery. Once again, I put my Cricut to good use, used the same matching papers from the pennants, and created this great alphabet/ number board. Since this display sits on top of the armoire, it allows us to keep some of our nicer books safe from sweet baby hands, but still accessible to share!

Finally, my sweet friend Jennifer completed the nursery with this painting. We found a similar painting in a store in the area, then she used colors from the nursery to create her own version. It is such a beautiful addition and really finishes off the room.

And there you have it! The only thing missing from this room is our baby girl! I can't wait to see Emily Ann in here, to rock her in the chair, watch her sleep in the crib, and enjoy her growing up. The Bump said in my weekly updates this week that her major organs are finished developing, so she is welcome to come whenever she likes! 3 weeks until her due date!

Happy Friday friends!
Related Posts Plugin for WordPress, Blogger...